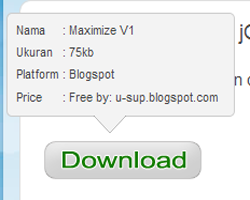
Demo langsung bisa melihat Disini : Coda Bubbles dengan jQuery
Untuk membuat Coda Bubbles dengan jQuery kamu bisa langsung mengikuti langkah dibawah ini :
2. Klik Tanda anak panah >> Klik template
 3. Klik Edit HTML >> Proceed
4. Maka akan terlihat Halaman Kode HTML template kamu
5. Salin kode CSS berikut tepat diatas ]]></b:skin> (gunakan Ctrl + F untuk mempermudah pencarian)
Untuk membuat Coda Bubbles dengan jQuery kamu bisa langsung mengikuti langkah dibawah ini :
Membuat Coda Bubbles dengan jQuery
1. Masuk ke Dasboard Blogger2. Klik Tanda anak panah >> Klik template

4. Maka akan terlihat Halaman Kode HTML template kamu
5. Salin kode CSS berikut tepat diatas ]]></b:skin> (gunakan Ctrl + F untuk mempermudah pencarian)
/* bubble coda with jQuery */6. Salin kode jQuery dibawah ini dan letakkan di atas kode </head>
.bubbleInfo {
position: relative;
}
.popup {
font-size:11px;
width:200px;
background:#F3F3F3;
padding:3px 5px;
border:1px solid #CCC;
position: absolute;
display: none; /* keeps the popup hidden if no JS available */
bottom:60px;
-moz-border-radius:5px;
-khtml-border-radius:5px;
-webkit-border-radius:5px;
border-radius:5px;
}
.popup:after{
border:15px solid;
border-color: #F3F3F3 transparent transparent transparent;
content:"";
display:block;
height:;
width:;
position:absolute;
bottom:-30px;
left:80px;}
<script src=http://ajax.googleapis.com/ajax/libs/jquery/1.4.2/jquery.min.js?ver=1.4.2 type=text/javascript/><script src=jquery.js type=text/javascript/>
<script type=text/javascript>
$(function () {
$('.bubbleInfo').each(function () {
// options
var distance = 10;
var time = 250;
var hideDelay = 500;
var hideDelayTimer = null;
// tracker
var beingShown = false;
var shown = false;
var trigger = $('.trigger', this);
var popup = $('.popup', this).css('opacity', 0);
// set the mouseover and mouseout on both element
$([trigger.get(0), popup.get(0)]).mouseover(function () {
// stops the hide event if we move from the trigger to the popup element
if (hideDelayTimer) clearTimeout(hideDelayTimer);
// don't trigger the animation again if we're being shown, or already visible
if (beingShown || shown) {
return;
} else
{
beingShown = true;
// reset position of popup box
popup.css({
top: -100,
left: -33,
display: 'block' // brings the popup back in to view
})
// (we're using chaining on the popup) now animate it's opacity and position
.animate({
top: '-=' + distance + 'px',
opacity: 1
}, time, 'swing', function() {
// once the animation is complete, set the tracker variables
beingShown = false;
shown = true;
});
}
}).mouseout(function () {
// reset the timer if we get fired again - avoids double animations
if (hideDelayTimer) clearTimeout(hideDelayTimer);
// store the timer so that it can be cleared in the mouseover if required
hideDelayTimer = setTimeout(function () {
hideDelayTimer = null;
popup.animate({
top: '-=' + distance + 'px',
opacity: 0
}, time, 'swing', function () {
// once the animate is complete, set the tracker variables
shown = false;
// hide the popup entirely after the effect (opacity alone doesn't do the job)
popup.css('display', 'none');
});
}, hideDelay);
});
});
});
</script>7. Simpan dulu pekerjaannya
8. Langkah selanjutnya bagaimana menggunakannya atau menampilkan Efek yang telah dibuat tadi langkahnya cukup mudah, yaitu cukup menggunakan kode dibawah ini pada postingan kamu atau juga bisa diletakkan pada kodesidebar:
- Warna hijau : URL atau link target yang akan dituju (harus diubah dengan link download kamu)
- Warna biru : URL tombol (boleh diganti boleh tidak)
- Warna merah : Keterangan dari file / link yang dimaksud silahkan dirubah sesuai dengan punya anda.
- Setiap akan menampilkan Coda Bubble ini cukup meletakkan kode langkah 8) pada postingan.
beingShown = true;
// reset position of popup box
popup.css({
top: -100,
left: -33,
display: 'block' // brings the popup back in to view
})
// (we're using chaining on the popup) now animate it's opacity and position
.animate({
top: '-=' + distance + 'px',
opacity: 1
}, time, 'swing', function() {
// once the animation is complete, set the tracker variables
beingShown = false;
shown = true;
});
}
}).mouseout(function () {
// reset the timer if we get fired again - avoids double animations
if (hideDelayTimer) clearTimeout(hideDelayTimer);
// store the timer so that it can be cleared in the mouseover if required
hideDelayTimer = setTimeout(function () {
hideDelayTimer = null;
popup.animate({
top: '-=' + distance + 'px',
opacity: 0
}, time, 'swing', function () {
// once the animate is complete, set the tracker variables
shown = false;
// hide the popup entirely after the effect (opacity alone doesn't do the job)
popup.css('display', 'none');
});
}, hideDelay);
});
});
});
</script>7. Simpan dulu pekerjaannya
8. Langkah selanjutnya bagaimana menggunakannya atau menampilkan Efek yang telah dibuat tadi langkahnya cukup mudah, yaitu cukup menggunakan kode dibawah ini pada postingan kamu atau juga bisa diletakkan pada kodesidebar:
<div class="bubbleInfo">Keterangan :
<a href="http://zonablogger.com/zonadownload" trigger=""><img class="trigger" src="https://blogger.googleusercontent.com/img/b/R29vZ2xl/AVvXsEiAGy9Hh7KqOheDnLvSO6_t1rc5tfPwntDdc268YMIv2Y3fDjKNnBHZdw4JdNJILQxpVaMoKWdXK8Q3lbNSlvdqZ9f8EfKOIXrWHt0TQLW84BOKnwpL6NKaGNc4TA1kVn6OjhICckUuCRuC/s1600/download.png" /></a>
<div class="popup">
<table><tbody>
<tr> <td>Nama </td> <td>: Maximize V1</td> </tr>
<tr> <td>Ukuran</td> <td>: 175kb </td> </tr>
<tr> <td>Platform </td> <td>: Blogspot </td> </tr>
<tr> <td>Price </td> <td>: Free by: blogspot.com</td> </tr>
</tbody></table>
</div>
</div>
- Warna hijau : URL atau link target yang akan dituju (harus diubah dengan link download kamu)
- Warna biru : URL tombol (boleh diganti boleh tidak)
- Warna merah : Keterangan dari file / link yang dimaksud silahkan dirubah sesuai dengan punya anda.
- Setiap akan menampilkan Coda Bubble ini cukup meletakkan kode langkah 8) pada postingan.


0 komentar:
Posting Komentar